Remote control Lawn Mower manual instructions
June 27, 2024
Safety Protection and Precautions
Warnings
1, Read these instructions carefully before use. Understand these safety precautions,
especially the emergency handling
methods, which are more important than the correct usage!
2, Only trained personnel should operate this machine, otherwise injury can occur.
3, Adjust the cutting grass height before starting the engine.
4, No one should approach within 1.5 meters on either side or 5 meters in front of the
machine!
5, If the machine encounters an obstacle and cannot move, or if the machine topples
over, assistance can only approach
to lift or pull after disconnecting the clutch and shutting off the engine.
6, Gasoline is highly flammable and explosive. Fire safety measures must be taken!
Refuel only with the engine off and
in a well-ventilated area. If you need to refuel during use, cool the engine first!
Safety Measures
1, The muffler can become very hot, Clean weeds in time to prevent a fire.
2, Always maintain a safe distance of at least 5 meters from the machine while in
operation.
3, Make sure the engine oil level is within the normal range to ensure proper
lubrication during use.
4, Do not tilt the engine head downwards to prevent oil from entering the carburetor,
which can cause difficulty in
starting the engine.
5, Clean the air filter every 4-10 hours.
6, Change the engine oil after the first 10 hours of use, and then every 50 hours
thereafter.
7, Wait at least 8 seconds between engine starts.
8, The remote control is factory set with 8 keys that should not be adjusted, If you
need to change the left and right
hand settings, please contact the manufacturer (see page 6 of the manual for
details).
9, Please avoid the remote control and the electrical parts of the lawn mower from rain
and
water ingress. Once the mower has
gotten water in it, you cannot start the engine of the mower and the mower will not
work. If the remote control
batteries are low and need to be replaced, they should be replaced when the mower is
closer.
10, When the mower is idle for long periods, it should be inspected and maintained
regularly, Charge the battery every
month (use a 48-volt electric vehicle lead-acid battery charger, keep the charging time
around 4 hours until full), keep
it in a dry and ventilated space to prevent dampness.
11, Before starting the machine, move it to a flat surface, check the gasoline level,
oil gauge, main electrical switch,
and whether the start button (or pull start) is functioning normally, The throttle
switch should be turned to maximum,
Operators should stay away from the machine, press the start button, hold it for about 4
seconds until the engine
starts, let it run idle for about 2 minutes to confirm normal operation before starting
work, If the engine does not
start, wait 8 seconds before trying again to avoid relay burnout.
12, Operators should be equipped with protective gloves, helmets, dust masks, protective
glasses, protective clothing,
(For female operators, hair should be properly covered) to avoid accidents.
13, Before each use, check the gearbox oil by opening the oil fill port, if the oil
level is visible, it is normal.
14, Before turning on any remote control, make sure all other switches are off to
prevent the machine from starting
automatically when the power is turned on, When the machine stops working, the main
power switch should be turned off.
Chapter 1: Purpose, Features, and Technical Specifications
The lawn mower operates in mowing mode both when moving forward and backward, ensuring
high efficiency. Be cautious about
switches and the fan when moving backward to prevent them from hitting objects.
1, The lawn mower has both mowing and grass crushing functions.
2, The power is hybrid, utilizing both fuel and electricity, ensuring long operating
hours.
3, The motor is a brushless type, which is energy-saving and durable.
4, The gearbox uses high modulus gears, which are long lasting.
5, Applicability: It can be widely used in mountainous areas, hills, and flat land. Its
track mobility is excellent,
making it especially suitable for orchard mowing. With accompanying equipment, it can
also perform functions like
air-spraying pesticides and in-field transport.
For technical specifications, please see the links below for the different models:
robot Lawn Mower KT10
technical specifications
Lawn Mower KT13
technical specifications
robotic Lawn Mower KT50
technical specifications
Lawn Mower KT80
technical specifications
Remote Control Lawn Mower KT90
technical specifications
Chapter 2: Main structure and components
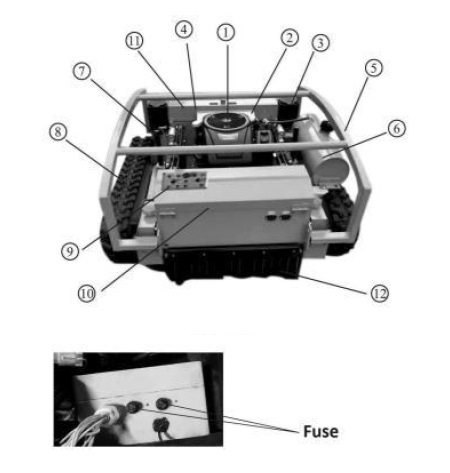
1, Engine
2, Generator
3, Travel Motor
4, Receiver Antenna
5, Bumper
6, Fuel Tank
7, Electric Grass Height Adjuster
8, Tracks
9, Remote Controller
10, Battery Box
11, Electrical Box
12, Grass Deflector Chain
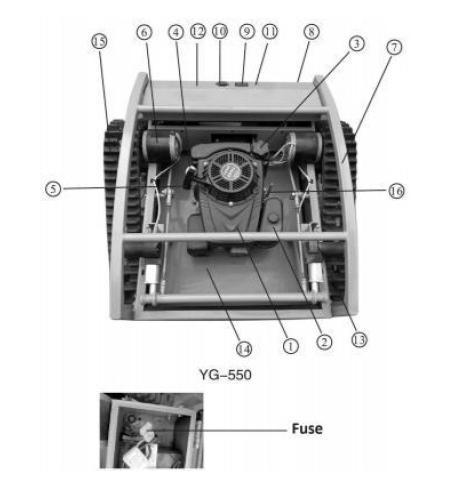
1, Engine
2, Air Filter
3, Gasoline Tank
4, Engine Oil Filling Port
5, Engine Pull Starter
6, Travel Motor
7, Bumper
8, Power Switch
9, Voltage Display
10, Charging Port
11, Engine Kill Switch
12, Electrical Box Cover
13, Lifting Electric Drive Pusher
14, Chassis
15, Tracks
16, Throttle Switch
Chapter 3: Adjustment, Installation and Usage
This machine has been routinely adjusted at the factory before shipment. However, before using the machine, users should inspect and adjust all components to ensure optimal operation of the remote-control lawn mower.
I. Daily Inspection
Check engine oil level
Note: Before operating the engine, add lubricating oil to the normal
level in accordance with the
engine instructions. Check every 4 hours. Operating the engine with oil level below
normal can lead to serious engine
damage!
(1), Position the engine horizontally.
(2), Unscrew the engine oil gauge and wipe it clean.
(3), Insert the oil gauge into the filling hole (no need to screw).
(4), Take out the oil gauge and check oil level. If the oil level is within the range of
half of the gauge grid, it is
normal.
Refer to the engine user manual for details on oil use.
Note: The muffler is at a high temperature during operation. Do not
touch with hands, clean the
surrounding grass clippings, leaves and other debris in time to prevent combustion and
serious damage or injury.
Never run the engine without an air filter, as this will accelerate engine wear.
II. Cutting Grass Height Adjustment
Use remote control to electric lift for adjustment.
III. Blade Assembly and Disassembly
Lift the lawn mower or pad the crawler position. Loosen the blade fixing screw to remove or replace the blade. Loosen the blade holder fixing screw at the bottom to remove the blade holder and blade together. ( Note: When replacing the blade, both blades need to be replaced.)
IV. Use of Remote Control
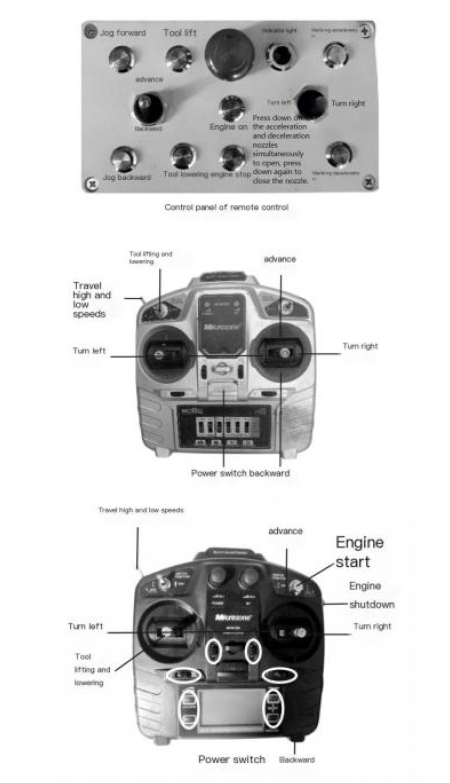
1, Turn on the remote control switch.
2, Turn on the main switch of the machine, the machine and the remote control enter the
connected state.
3, Tap forward and backward, the machine will move forward and backward.
4, Press the engine start, the mower blade rotates, and the machine enters the working
state. Start the petrol engine
for long-distance walking.
5, Move the travel switch to the forward position, the machine moves forward, move to
the reverse position, the machine
moves backward. Move to the middle position, the machine stops.
6, Direction adjustment: When the travel switch is in the forward or reverse position,
the machine theoretically moves
straight forward or backward. However, due to uneven ground or bumps, there will be
walking deviation. At this time,
adjust by toggling the left and right turn switches. Toggle the left or right turn
switch for a long time, the machine
completes the turn.
Note: Do not press the 8 buttons shown in the white circle in the right figure!
The parameters have been set at the
factory, otherwise it will cause the machine to be unusable.
7, Walking speed adjustment: Holding the walking acceleration button, the walking speed
gradually increases. Holding the
walking deceleration button, the walking speed slows down.
8, Tapping operation: Move the forward and backward switches to the middle position,
hold the forward tapping button,
the machine is in the forward tapping state, let go of the tapping button, the machine
stops walking. Hold the backward
tapping button, the machine is in the backward tapping state, let go of the backward
tapping button, the machine stops
walking.
9, Remote control charging: Charge the remote control with the machine's own charger
every 20 hours of operation.
Chapter 4: Maintenance and Care
Maintenance of Gasoline Engine
Warning:
(1), Turn off the engine before any maintenance.
(2), To prevent accidental engine starting, set the remote control switch to OFF.
(3), The engine should be serviced by professionals.
Note:
Use genuine original factory series engine parts or their
equivalent. Using poor quality
alternatives can damage the engine. Regular inspections and adjustments are essential to
maintain the
engine's performance. Regular maintenance also ensures a long service life. The required
maintenance intervals and the
corresponding tasks are explained in the table below:
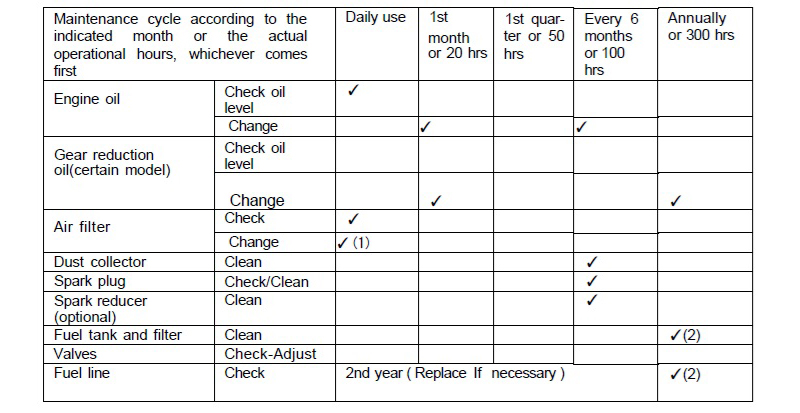
Note: If used in dusty areas, maintenance should be frequent.
I. Changing the Lubricating Oil
When the engine is still warm, drain the oil to ensure a rapid and thorough discharge,
For engines with an oil filter,
replace the oil filter at the same time.
1, Remove the oil fill cap and the oil drain plug to drain the lubricating oil.
2, Install the oil drain plug and tighten it.
3, Refill with the recommended lubricating oil and check the oil level.
4, Put back the oil fill cap.
II. Air Filter Maintenance
Note: An overly dusty or damp air filter will prevent air from entering
the carburetor, causing the engine to smoke and
potentially damaging the engine, Regular maintenance of the air filter is essential, If
the engine operates in very
dusty areas, it should be cleaned every 2 hours.
1, Remove the butterfly screw cap and the air filter cover, then take out the
filter.
2, Blow off the dust on the filter using compressed air.
3, Reinstall the air filter and its cover.
III. Spark Plug Maintenance
Note: Never use a spark plug outside the correct heat range. To ensure
the normal operation of the engine, the spark
plug gap must be appropriate and free of carbon deposits.
1. Replace the spark plug using a specialized spark plug wrench.
Note: If the engine has just stopped running, the muffler will be hot.
Be careful not to touch it.
2. Visually inspect the spark plug. If there is noticeable wear or the insulator has
cracks or defects, please replace
it.
3. Measure the gap of the spark with a gap gauge. If adjustment is needed, bend the
electrode. The correct gap should be
0.70 to 0.80mm.
4. Check if the spark plug gasket is in good condition. To avoid cross-threading,
hand-tighten it first.
5. After the spark plug is fully seated, use a dedicated socket wrench to tighten it,
compressing the washer.
Note: When installing a new spark plug, turn an additional 1/2 turn
after compressing the washer. When reinstalling a
used spark plug, turn an additional 1/8 to 1/4 turn after compressing the washer.
Note: If the engine has just been operated, the muffler will be hot.
Wait for it to cool down beforeproceeding.
IV. Carburetor idle speed adjustment
1, Start the engine and let it warm up to its normal temperature.
2, When the engine is running at idle, adjust the throttle stop screw to get standard
idle speed, standard idle speed
is: 1500±150RPM.
Machine Maintenance
During operation, the machine inevitably experiences wear from rotation, friction, and load changes. This can result in loosening of connection bolts, wear of parts, disruption of the system's normal state, and abnormal clearances. This leads to reduced engine power, increased fuel consumption, component misalignment, and more frequent machine failures, severely affecting the machine's normal operation. To reduce the occurrence of the above situations, it is crucial to routinely perform preventative maintenance. This helps maintain the machine's optimal technical state and extend its service life.
I. Running-in
1, Refer to its user manual for the gasoline engine run-in.
2, For new or majorly repaired machines, operate under no-load conditions for half an
hour, Then, under light-load
conditions for 5 hours, promptly drain all the lubricating oil in the gasoline engine's
crankcase while it is still
warm, Refill with engine oil and run for 4 hours for the run-in, Only then can your
machine be put into regular
cultivation.
II. Technical Maintenance
A. Maintenance per Shift (before and after each work shift)
1, Listen and observe for any abnormalities in all parts (like unusual noises,
overheating, and loosening screws).
2, Check the gasoline engine and gearbox for any oil leaks.
3, Check if the oil level in the gasoline engine and gearbox is between the upper and
lower lines on the oil gauge.
4, Remove mud, weeds, and oil stains from the entire machine and its attachments
promptly.
5, Keep a detailed cultivation record.
B. First-level Maintenance (Every 150 hours of operation)
1, Carry out all daily maintenance tasks.
2, Clean the transmission case and change the oil.
3, Check and adjust the clutch, gear shifting system, and reverse system.
C. Second-level Maintenance (Every 800 hours of operation)
1, Carry out all tasks of the first-level maintenance.
2, Inspect all gears and bearings, If they show significant wear, replace them with new
parts.
3, Check other machine parts, mower blades, or connecting screws, Replace any damaged
parts with new ones.
III. Maintenance Checklist (Items marked with √ in the table indicate the necessary maintenance actions.)
IV. Transmission Box Maintenance
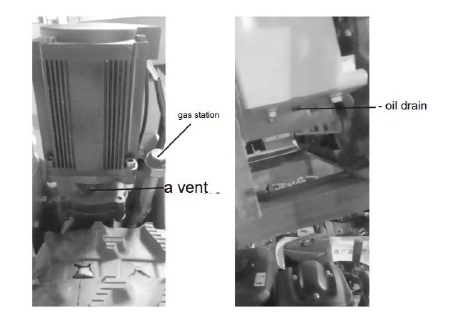
For the first 20 hours, open the oil filler cap, open the vent, and unscrew the drain plug. After completely draining the oil, screw the drain plug back in and fill with gear oil until it overflows from the vent. Subsequently, change the oil once a month.
V. Maintenance of the Entire Machine
When the machine needs to be stored for an extended period, the following measures
should be taken to prevent rust:
1, Seal the gasoline engine as instructed in the user manual.
2, Clean the exterior to remove dust and grime.
3, Drain the lubricating oil from the transmission box and refill with new oil.
4, Apply rust preventive oil to unpainted surfaces that are not made of aluminum
alloy.
5, Store the machine in a well-ventilated, dry, and safe indoor area.
6, Store all accompanying tools, product certification, and user manuals securely.
Chapter 5: Trouble shooting
Common Engine Problems
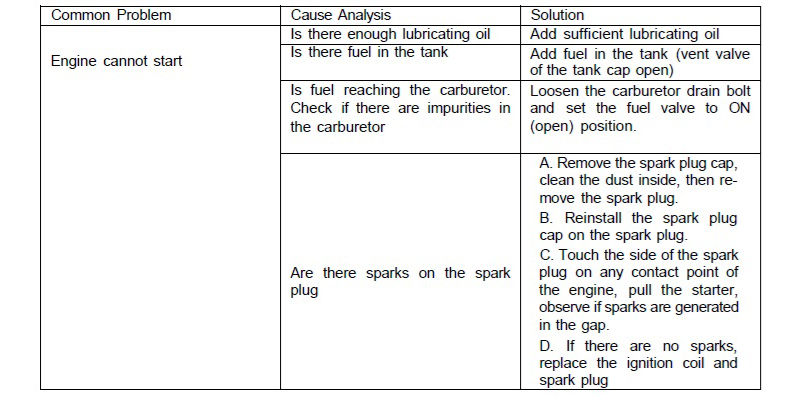
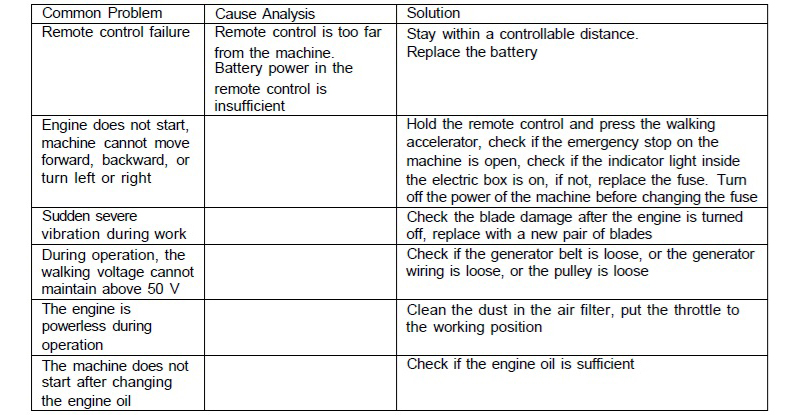
Common Problems and Solutions
Accessory List
